
Are you considering to start marketing your business and finally get your first paycheck?
Are you planning to try the Facebook ads? If not, you definitely should! A lot of online business owners you see these days started to up their game using Facebook ads. Knowing the basics of Facebook ads will help you prevent typical errors that cost both time and money to a lot of online business owners.
The truth is it’s so easy these days to reach out to your target audience using a Facebook ad campaign these days. In case you’re a rookie when it comes to technology and digital marketing, this article is for you.
In this article, you’ll find out a detailed guide and step by step explanation of how to set up your Facebook ad campaign that sells. Ready to set up your first Facebook ad campaign and curious to learn how?
Let’s dig in!
Decide as to where Facebook ads fit in your marketing campaign
You must have an action plan before you spend another penny on Facebook ads. Otherwise, you’re going to be flying blind without a clear idea of where you want to go.
To see consistent results, identify where you can use Facebook ads in your sales process. To help define your strategy, you need to answer these four questions:
- What’s your Facebook marketing goal? Do you want, for example, to generate new leads for your company, sales for your e-commerce store or blog subscribers?
- Do you have any website traffic current or consistent?
- Do you already have a mailing list? If so, is it effective and what is the number of people on that list?
- Can you develop unique content related to your business/industry?
Let’s look at the three Advertising Strategies that you can use for Facebook based on the answers to the questions mentioned above.
- Provide free content – to get your audience cozy. Marketing content is one of the most effective ways of defining your business to the market and warming up cold audiences Provide free and valuable content that will entertain, educate or inspire your preferred clientele. For example, you might use videos, lead magnets (guides, checklists, coupons, etc.), or blog posts.
- Engage people on your email list – It is twice as effective to spread your advertising message through Facebook ads and email marketing. Customers will see the advertisement message when they browse Facebook and also receive it in their mail inbox.
- Retarget website visitors – Installing the Facebook pixel on your website will enable you to target people who have recently visited your site.
The retargeting technique can also be the second phase of a content-first approach. Create a custom audience of people who have participated in your video content or Facebook page, and then run direct response promotions, marketing your products or services to them.
Once you have developed the strategy for your Facebook ads, you are good to go ahead with setting up your campaign for success.
So, are you ready to begin with creating your first ad???
Let me take you through the process step by step and educate you on aspects related to it as well. So,
What is the Facebook Ads Manager?
The Ads Manager is where you go, generally, to create and manage your campaigns. You can use the ad manager for the following purposes:
- Set up Facebook ad campaigns
- Create new ad sets and advertisements
- Manage Facebook ad offers
- Target several different audiences
- Optimize your ad campaigns
- Keep a trail of the success of your campaigns
- A / B check your ad campaigns on Facebook.
How to use the Ads Manager and Navigate it
There are three ways to access your account at the Facebook Ads Manager:
- Use this link to get to your Ads Manager account (I recommend bookmark the page for easy access whenever you want)
- Click on the drop-down arrow in any Facebook page’s top-right corner (to which you have Admin access) and pick “Business Manager” from the drop-down menu.
- Use Facebook’s Mobile App For Ads Manager to access and track your ad campaigns anytime, anywhere.
If you have never previously used the ad manager, it can be quite a lot at first to take in. The majority of your screen will consist of four tabs:
- Account Overview
- Campaigns
- Ad sets
- Ads
Let’s take a look at this chart for an idea of how to handle the Ads Manager:
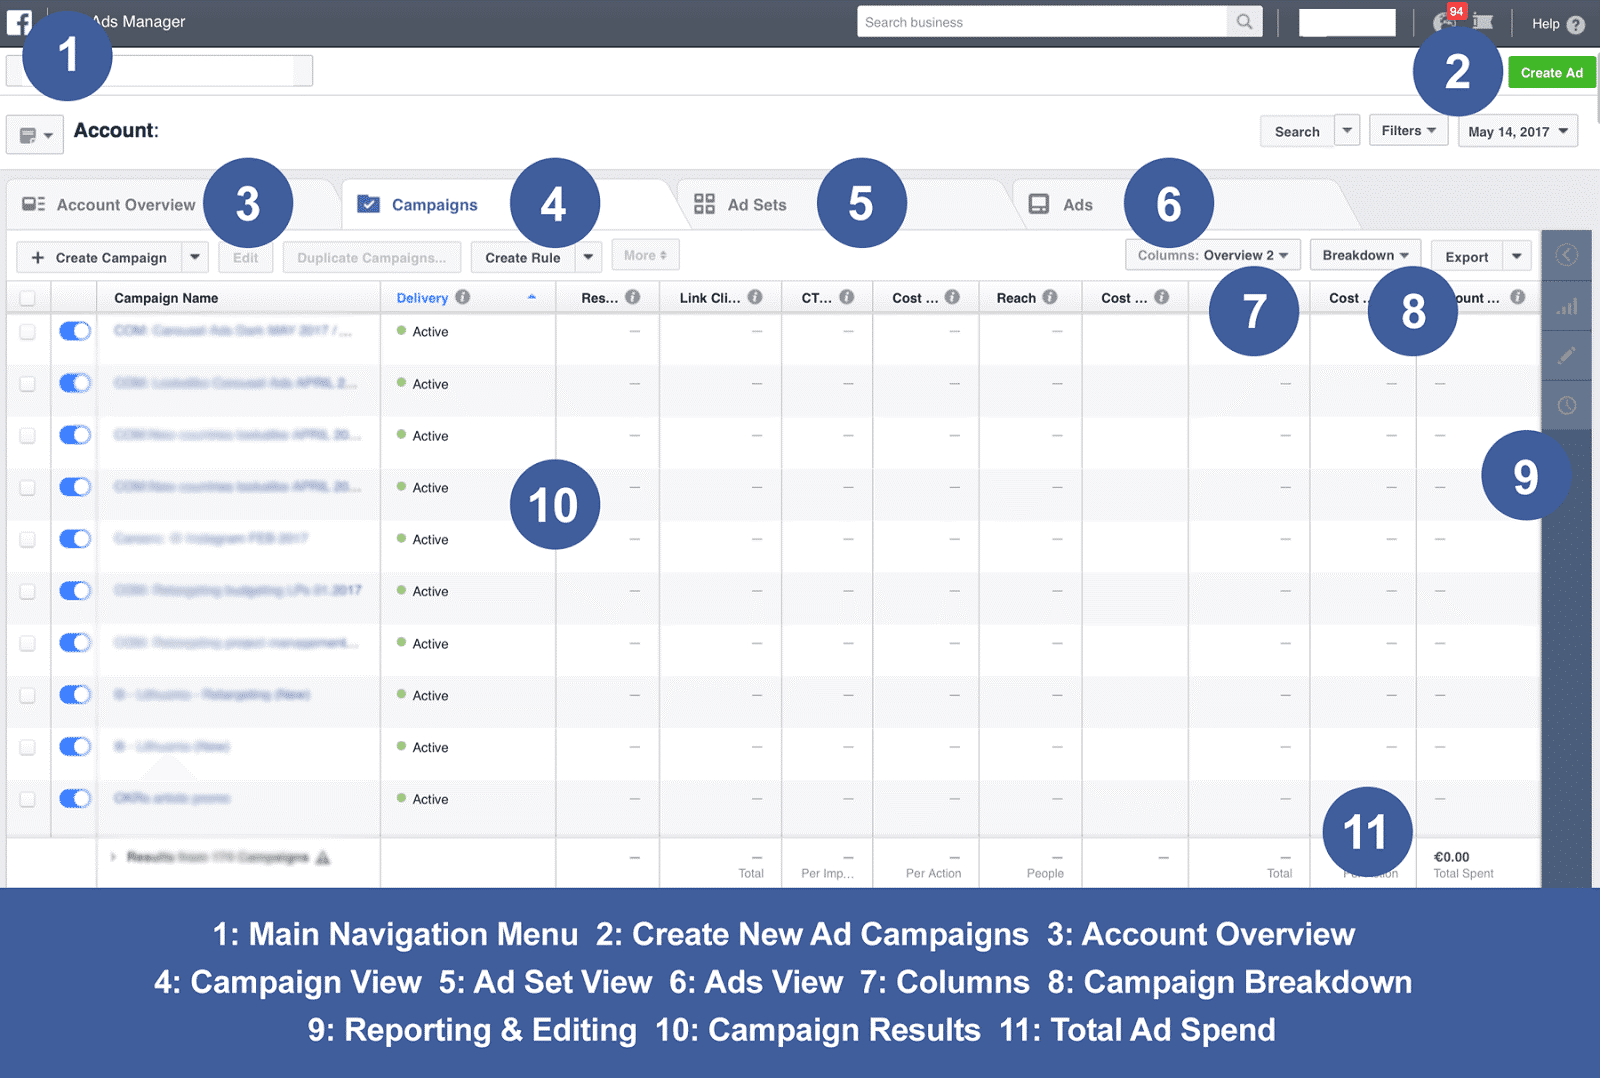
Photo Credit adespresso
Once you click around, you’ll find that all kinds of data and tools are available for you to use.
All your reports, resolution pixels, saved or personalized audiences and other information can be located in the left top corner of the screen, where Ads Manager is written. If you hover your pointer over “All Tools” in the bottom of the window, you will see all of your ad account creation, planning, measurement, asset tools that you should use along with the settings for the ad account.
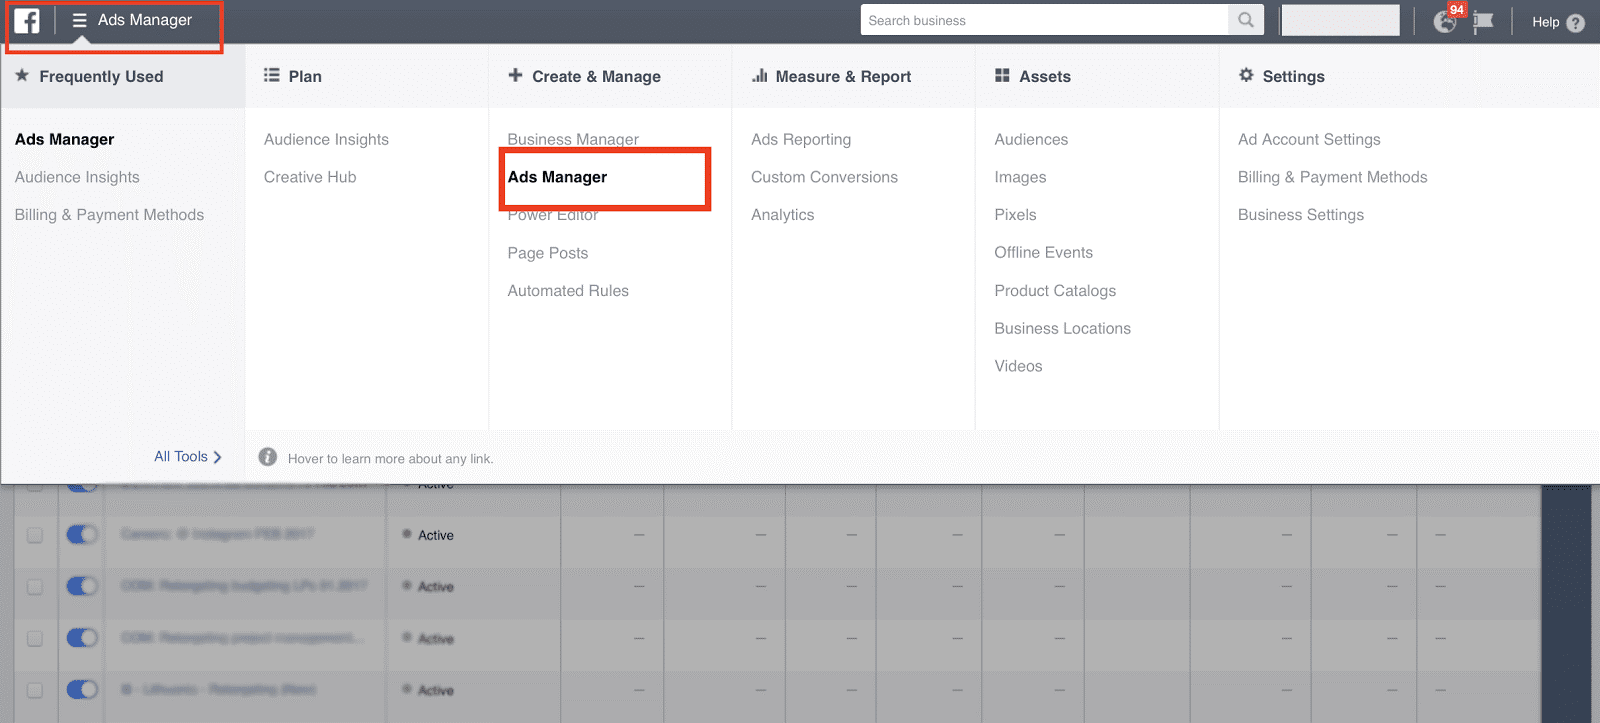
Photo Credit adespresso
By now, you should have a fairly basic understanding of browsing the ads manager.
So, now let’s jump into the fun part which is to set up our first campaign!
How to Setup a Facebook ads campaign for your Business
To set up a new campaign, you should go to the “Campaigns” tab. Then click on the green colour “+ Create” CTA to create from scratch a new campaign!
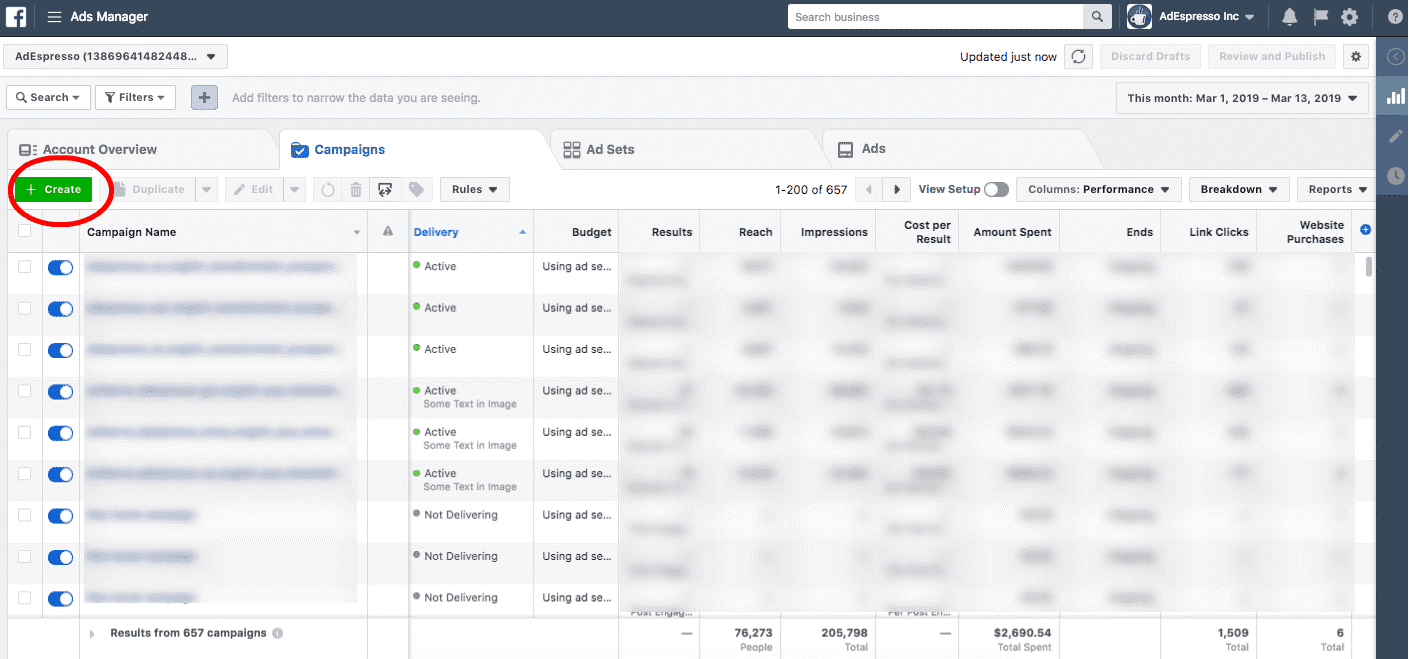
Photo Credit adespresso
To direct you through the creation of a campaign, Facebook does a good job. Once you have selected a campaign to create, you will see this:
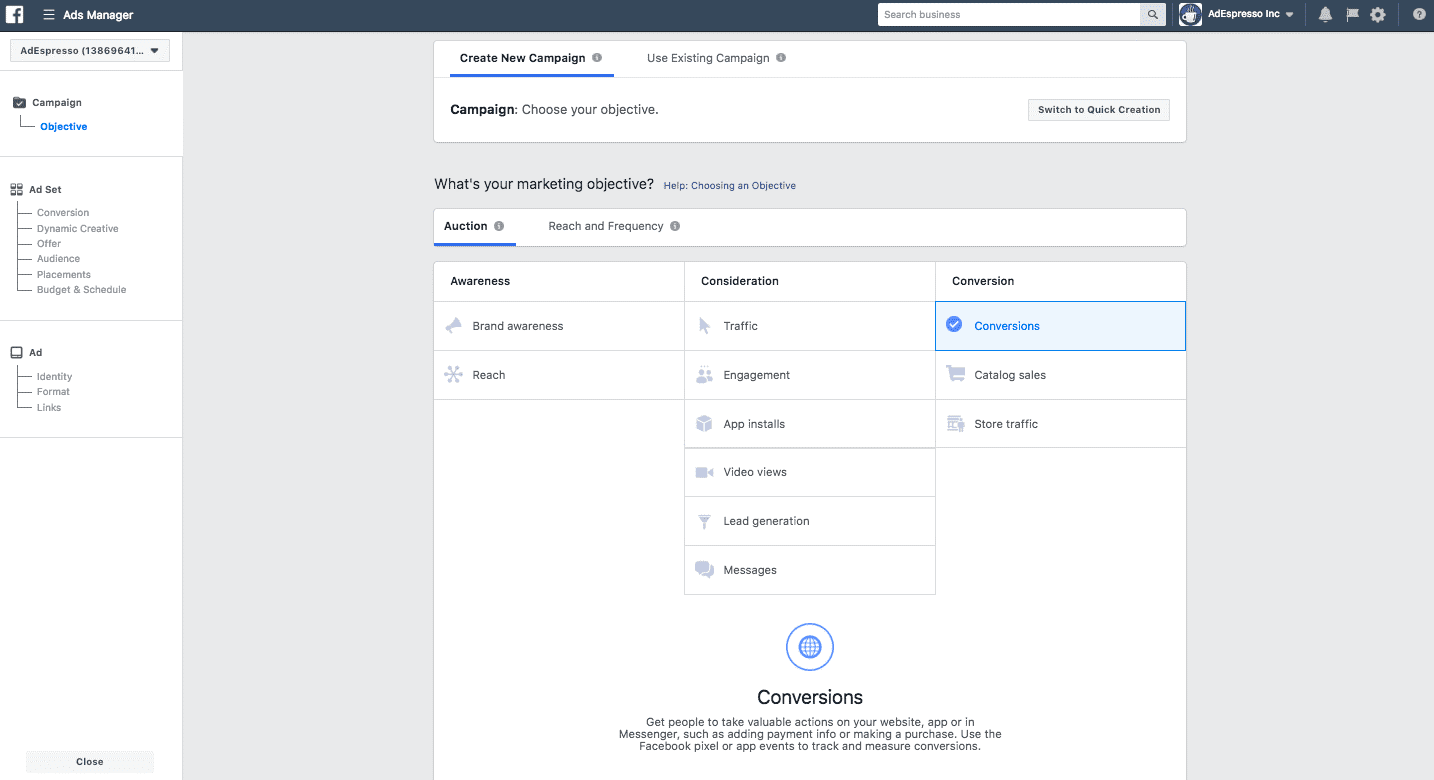
Photo Credit adespresso
If you’re new to all of this you may find it a bit overwhelming. But you don’t need to sweat. I’ll walk you through the entire process step-by-step.
Step 1: Select Your Campaign Objective
You may choose from a range of campaign objectives on Facebook that suit your advertising goals. For instance, if you’re trying to drive traffic to a physical location, you’d use “local awareness. You want to use “Conversions” if you intend to drive traffic to a website.
Here is a complete list of the goals of the Facebook campaign:
- Brand awareness
- Local awareness
- Reach
- Traffic
- Installation of applications
- Video views
- Engagement Lead generation
- Conversions
- Product catalogues
- Store traffic
- Messages
How to choose your campaign objective
Selecting your objective is vital as this is used by Facebook to decide certain elements of your campaign, such as available ad types, choices for bidding, and how it optimizes the campaign.
You should always choose the objective that best represents the desired campaign result. When you promote a website, you will most likely run a conversions campaign. And that is the type of campaign we are going to create today.
For example, if the end goal of your campaign is to submit information via a lead form to you, then you should choose the lead generation as objective, instead.
So, we’re creating our campaign on conversions.
Step 2: Name your Ad Campaign
Once we have decided about our type of campaign, let’s give a name to our campaign. This might seem like a pretty straightforward step, but when you start with Facebook ads, it is actually quite important to adopt practical naming conventions for your campaigns so that you can easily manage your campaigns as you scale and run more of them. This also sets you up when it comes time to analyze the results for hyper-efficient reporting later on.
For instance, you should include the date range in your campaign name for which the campaign will run. You can add more elements as under to your campaign name depending on whether you are advertising for a client or your own business:
- Brand name / website
- Target Audience /
- Specific audiences
- Artistic Form (Video? Carousel?)
- Facebook page, etc.
Hope this gives you pretty good ideas for keeping your campaigns organized and simplifying reporting with custom campaign names later on. You may also choose to create a split test on the campaign or optimize your budget after you have picked your objective.
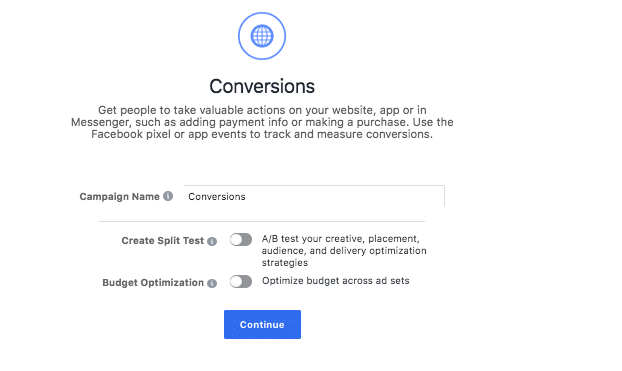
Photo Credit adespresso
Having a split test or A / B test helps you to conduct experiments and collect data that will demonstrate you the best creative, placement audience and delivery optimization techniques.
Let’s go on and set up our audience
Step 3: Set Up the Audience Targeting
Facebook has a lot of powerful ways to reach audiences. The next step is where you are going to create ad sets for audiences.
Looking at the main ads manager screen, you will see it has a tab for campaigns, ad sets and an ads tab.
The ads and ad sets are included within the campaign you create, with the ads containing a combination of creative and an adset having a specific audience and budget.
You have Two Options in this phase of your campaign setup:
- Create a new target audience
- Used an already saved audience
Custom or lookalike viewers are yet another extremely powerful choice for you to try. To put it briefly, with custom audiences, you can build audiences based on your website traffic by something called the Facebook Pixel. The pixel allows you to develop audiences in addition to monitor events (“conversions” that occur on your website, so this is something you’ll want to install immediately if you haven’t already done so. You will have to create these custom audiences from the assets-> audiences section of your ad manager. They can’t be generated during campaign creation.
Now we can move on quickly to our audience. This section appears like this:
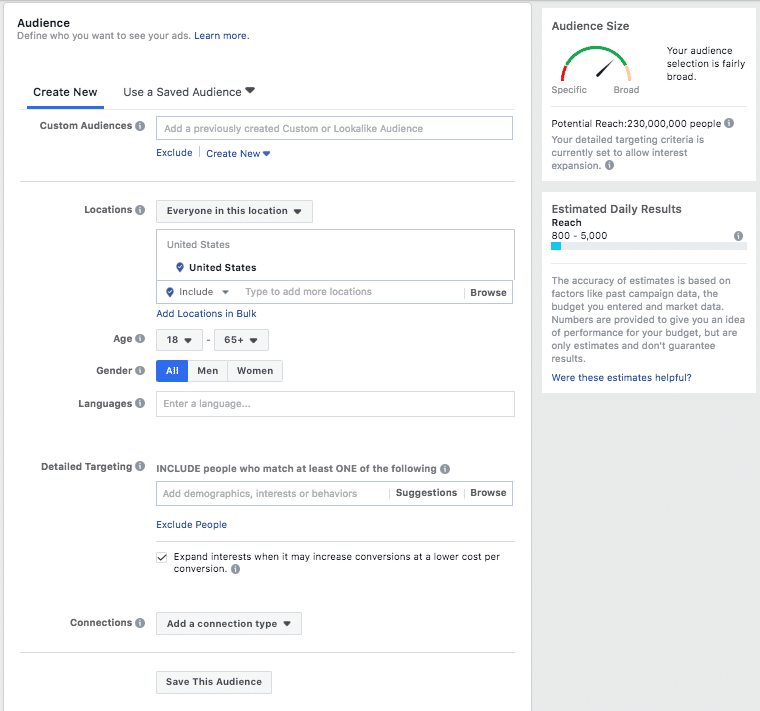
Photo Credit adespresso
As you build your audience, Facebook shows an expected daily reach and tells you if your audience is too large, too small or just right by using the meter. You can target a very specific audience through your campaign by using behaviours, interests, demographics, ‘Likes’ and searches of the Facebook users.
Targeting the right audience for Facebook is of immense value for your marketing’s outcomes, and we’ll talk more later on how to build unique or lookalike audiences.
For now, let’s continue to walk through the rest of the Facebook campaign setup.
Step 4: Set Up Your Ad Placement
By default, Facebook will have selected “automatic placements,” which can include Facebook, Instagram and Audience Network, but will generally use the optimized placements to deliver the best results for you. If you have some data about which placement works best for you, you can also choose to edit your placements.
The list of placements include the following:
- Feed
- In-stream videos
- Right column
- Instant Articles
- Stories
- Marketplace
- Stories
- Feed
Audience Network
- Native, banner and interstitial
- In-stream videos
- Rewarded videos
Messenger
- Inbox
- Sponsored messages
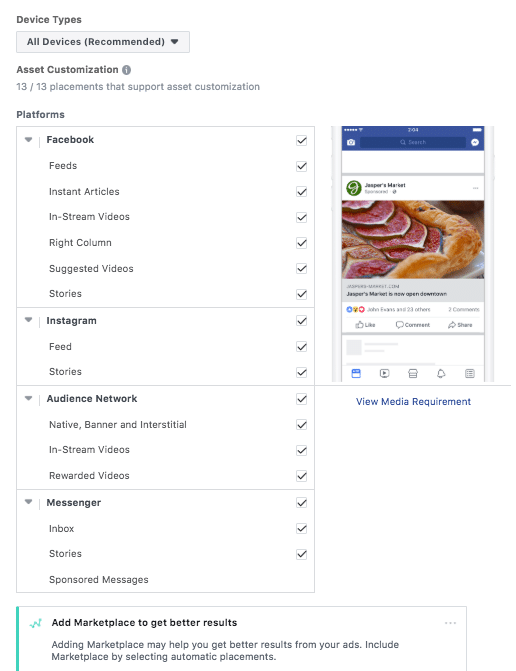
Photo Credit adespresso
Though Facebook is good at auto-optimizing your ad placements, it is extremely important to do split testing of many elements of your campaign. You have to know where your audience is, and you should approach them there.
How to choose ad placements
It is recommended that you should use the Automatic Placements when setting up your first campaign. However, when you intend to get people to convert to your website, and it’s hard to navigate on the mobile, deselect the placements for the Mobile Newsfeed, Instagram and Audience Network.
The placements recommended for every campaign objective by the Facebook are mentioned below:
- Engagement:Facebook and Instagram
- Brand awareness: Facebook and Instagram
- Traffic(for clicks and app engagement): Facebook and Audience Network
- App installs: Facebook, Instagram and Audience Network
- Product catalogue sales: Facebook and Audience Network
- Conversions: Facebook and Audience Network
- Video views: Facebook, Instagram and Audience Network
Step 5: How to Budget for your Ad Campaign
Choosing the appropriate budget for your campaign is vital for its success. Facebook gives you two budgeting options:
Daily budget
Facebook is going to spend this amount on delivering your ads every day during your campaign. When you set your daily budget, you’re asking Facebook to get the results every day for approximately your daily budget.
Some days when Facebook sees high-potential opportunities, it may spend up to 25% more than your daily budget (and then lower your spending on low-potential days). As you choose your daily budget, your daily ad spending may look like a collection of curves.
Don’t worry, that’s perfectly normal and indicates that Facebook is auto-optimizing the delivery of your ad (and it is a good thing).
Lifetime budget
Facebook will split the overall campaign budget more or less equally across the campaign dates. When you set a lifetime budget, Facebook will ask you for campaign dates so that it can estimate the average spending for each day.
We suggest that you allocate a daily budget and an unlimited duration of the campaign so that you can subsequently change the amount of your daily budgets and pause the campaign whenever you see fit.
Important! You can’t change the budget type of an ad set after the ad set has been created During the campaign setup, make sure you make the right selection.
Step 6: Set Up Your Facebook Ads
The actual advertisements are what Facebook users will see, and you would like them to be attractive and perfect. Setting up your Facebook ad is the final step of your campaign creation process, you can choose your favourite Facebook ad style, put in your ad images and copy.
There are two options: either pick an existing Facebook Page post or create new ads.

Photo Credit adespresso
Summing Up
Facebook ad campaigns are one of the best and most reliable business advertisement channels. The process mentioned up is a detailed guide which if you follow step by step will help you launch your first perfect ad campaign on Facebook.